- Download the plugin .zip file from the Purchase History page
- Upload the plugin one of two ways:
- Unzip & upload the plugin folder to the
/wp-content/plugins/directory - Visit the Plugins menu in WordPress. Tap buttons Add New → Upload Plugin → Browse and locate the .zip file
- Unzip & upload the plugin folder to the
- Activate the plugin through the Plugins menu in WordPress
- Copy & save your license key in the box at Forms → Settings → Google Sheet
- Visit the Google Sheet tab in the Settings of any Gravity Form
- Learn how to configure a form below: How to Connect a Gravity Form to a Google Sheet
How to Get a License Key
Licenses are for sale at entriestogooglesheet.com/pricing.
Find Your License Keys
License keys visible on the Checkout page immediately after purchases. Your license keys are always available after logging into this website. Visit the Purchase History page to see your purchases. Tap the View Licenses link near the any invoice to find purchased license keys.
How to Connect a Gravity Form to a Google Sheet
A Google Account is required to use this plugin. During steps 1 through 3, it may be convenient to open WordPress in one tab and Google Cloud Platform in another.

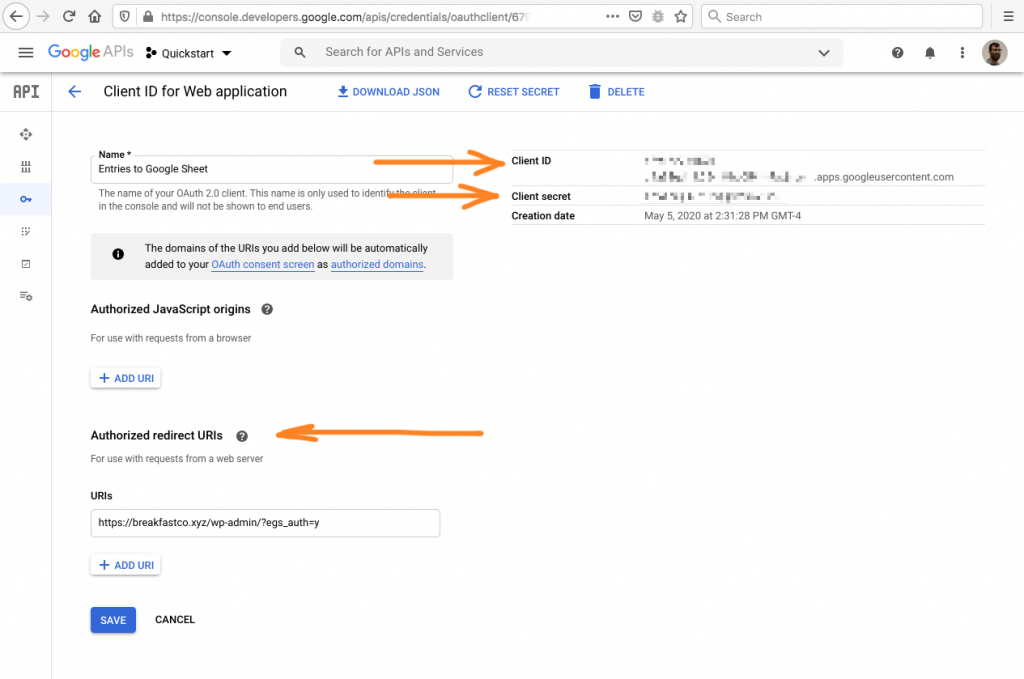
- Obtain a Client ID and Client Secret from Google
Step 1 overlaps Google’s instructions to create OAuth credentials. Try this first:
- Login to Google Cloud Platform
- From the projects list, select a project or create a new one. You might land in a sample project called Quickstart. Look for a project menu near the Google Cloud Platform logo text. If you create a project, you may have to wait a few moments before tapping a SELECT PROJECT button to load the new project.
- Browse the Library for the Google Drive API and Google Sheets API. Visit and Enable both for the project you created. Make sure the correct project name appears at the top of the library before Enabling APIs.
- Return to Google Cloud Platform and find Credentials in the APIs & Services menu on the left.
- Click OAuth client ID under the CREATE CREDENTIALS menu near the top.
- Choose Application Type Web Application.
- Provide a name like “Entries To Google Sheet at example.com”
- Back in WordPress,
- Visit the Google Sheet tab of a Gravity Form
- Click the Add New button to create a new feed
- Copy the Authorized Redirect URI to your clipboard
- Return to Google Cloud Platform, click the ADD URI button, and paste the Authorized Redirect URI.
- Click Create.
- Copy and paste the Client ID and Client Secret pair into the corresponding boxes in the Connection section of the feed settings page you opened in step 8.
- Click Save Settings to save the credentials in WordPress
- Click the Create Sheet Button
The Create Sheet button will attempt to create a new Sheet at the root of your Google Drive. The first time you click this button, creation will fail, and you will prompted to click a link to give this website access to your Google Drive.
- Click the Link in the Failure Message
An error message will appear at the top of the form settings page. Click the link to visit the Google consent screen. Google will prompt you to choose a Google Account and grant the website access to create files inside that account’s Google Drive. After you grant consent, you will be redirected back to the feed settings.
- Click the Create Sheet Button Again
After authorizing this website to access your Google Drive, click the Create Sheet button again. A success message will confirm that a new Sheet was created at the root directory of Google Drive. Use the Open Sheet and Insert Test Row buttons to confirm WordPress can write to the Sheet.
FAQ: Can I rename and move the Sheet in my Google Drive after it’s created? - Consider checking the Edit & Delete Rows checkbox to also sync edits. Use the Save Settings button to make feed configuration changes.
- Return to the Google Sheet tab of the form and confirm the feed is Active.
- Submit the form & celebrate!